Join Your Greener Future...

Find Your Greener Future on Facebook to get the latest updates!
Home | Contact Me | Manuela's Story | GarbArt Projects and Pictures | __________________________________________________________________________________________________________________________

Saturday, November 27, 2010

Craft: Make Your Own Advents Calendar (Or Fancy Modern Art Project!) This Year

(This is an image of a typical advents calendar filled with chocolates, sold by amazon)

I grew up with "Adventskalendern" in Germany. These things where you get to open one window every day during the month of December until Christmas, you know.
When I was a kid, most of them were simple and filled with chocolates.
Nowadays you can find them in all sizes and shapes, filled with toys, candy, little books, or you can get them empty and fill them up yourself. 
Even though I'm not religious, this tradition has grown to me (or is it grown on me??? Whenever I'm tired my English is leaving me...) and I still love getting the calendars every year (I have to remind my husband, otherwise I'd be disappointed :-)

And of course I want our kids to enjoy them as well. But I refuse to buy the calendars and then, after one month of use, throw them out. Too much waste, money, and resources involved in that.
So I thought about how I could make my own. And one that looks interesting enough to be noticed and loved by our 4 year old boy.

And this is what I came up with:

Voila - our "hanging boxes from a snow-covered branch advents calendar"

It looks really pretty and our son was psyched when he discovered it hanging in the morning. Unfortunately I wasn't able to capture the real look of it - the pictures just give a slight idea of how it really looks.

This is what I used:
  • Dry branch from outside (about 3 1/2 feet)
  • 2 balls of white yarn (I usually stock up at garage and house sales whenever I see some nice yarn)
  • Cotton balls 
  • Illusion cord (optional)
  • Scissors
  • 2 ceiling hooks
  • 24 paper boxes (made of old holiday cards - click on the link to see the post with instructions)
  • Needle
  • Glue
  • 24 little surprises (get creative!)

This is how I did it:

  1. I wrapped the branch tightly with the yarn
  2. The ends that were still visible I covered with cotton balls
  3. I hang the branch up on two ceiling hooks (put in place by my husband) with illusion cord (yarn will work just as well)
  4. With a needle, I made holes in the lid of each box and threaded illusion cord (yarn will do just fine) through them
  5. I then hang all the (filled!) boxes on the branch
Depending on how old your kids are they could get involved in creating it. I had a lot of fun doing this project, and I hope you will, too!

Monday, November 22, 2010

Craft: How To Fold Beautiful Boxes Out Of Those Old (Holiday) Cards


I don't know about you, but I love cards. Somehow it's still special to receive real mail, especially when it comes in form of a beautiful and meaningful card.
Whenever it's a birthday in our family and we get birthday cards or around the holidays, I'll always display all the cards in our apartment and I also save them - they're too precious to throw out, to me anyway.

Recently I came across a box full of old holiday cards, and just thought of something: what if I found a way to fold all those nice cards into boxes?
I looked online and came across a step-to-step guide at about.com how to do it, and it's easy. Try and you'll see.


You'll need a square piece of paper - so unless you work with a square card, you'll have to cut off some to make it a quare.
Once you have a square, fold the paper diagonally. Open up and fold the other side diagonally as well. You'll see an X when you open the paper.

 
In turn, fold each corner into the center of the square. Firmly crease the fold.

Tip: Use a folding bone to help make a crisp fold. A butter knife can also be used to score the paper or cardstock prior to folding.


Fold the first corner to the line of the first fold made, on the opposite side. Repeat for each corner.

Tip: Be careful when folding the third and fourth corners not to fold to the wrong line.

Fold each corner to meet the nearest fold line.

Make four cuts as indicated in the picture. It makes no difference which corners are used as long as they are opposite each other.

Tip: You'll see 4 squares in the middle. Make sure you don't cut anywhere near those 4 squares.

Fold the two corners without cuts into the center.

Tip: A dab of glue will help hold the folds in place, however this is not essential.

Fold edges up as shown, this forms two of the sides of the box.

Fold the cut ends in at either end of the box.

Fold the two remaining pieces into the middle of the box, this will securely hold the box together and there is no need to add glue.

Make a base in exactly the same way, however cut the square a fraction smaller so the base will fit into the top.


It's really easy, and once you get the hang of it, you can do it in less than a minute.

I use the front of the card as the lid, and make a slightly smaller box out of the inside (usually the part with the writing on it) for the bottom.

Have fun!

Tuesday, November 16, 2010

Recipe: Yummy Yummy Chocolate Dip


Most people think about guacamole when it comes to pureeing avocados.
I use the super healthy fruit on a daily basis for tons of different things, from (ice) creams to puddings or spreads.

And a chocolate dip. Yes, chocolate dip!

It's so unbelievably easy and so yummy. Try it:

For 6 people I used 3 avocados, about 3 Tbsp of cocoa powder and raw honey (maple syrup would work just as well).
And for once I won't give exact measurements (as if I ever do :-) because it's really up to you how chocolaty and/or sweet you like it.

Just blend the avocados, add the cocoa powder and the honey, add more if needed, and voila - you got the richest, healthiest chocolate cream that I can imagine.

Arrange with slices of apples and enjoy!

P.S. I had some leftover and put it in an airtight container overnight. The next day it had hardened somewhat in the fridge and now it had the texture of rich chocolate mousse. Yum! I had the whole rest of it by myself in one setting!

Wednesday, November 10, 2010

Green New World


I call this post Green New World because I notice changes around me - green changes, and I like it.

We have to be critical, we have to care about our environment, our health, our wellbeing, we have to change in order to achieve change.

But we also have to recognize the good, and I feel like things are changing. Slowly, but steadily.
I read more and more about vegetarian and even vegan lifestyle (the other day there was an article about a farm in Germany that only takes care of old and/or sick animals who nearly got killed because they didn't produce anymore. I know, nothing new, but hey, it made it to one of the biggest online magazine sites!).

I see more and more people bringing their own bags to shop.
My son's preschool is composting! The teachers are encouraging healthy snacks! They learn about recycling!
Just little examples which show that we're moving to the right direction. Wonderful!

When I discovered a little hole in my favorite pair of jeans today (what the heck - another pound plus?!) I evaluated my options:
  1. try to fix the problem myself = greenest option, but nah - unfortunately my sewing skills are not that good
  2. bring jeans to dry cleaner to get fixed
  3. bring jeans to green dry cleaner to get fixed
  4. throw jeans out = horrible! First off, these are my favorites and second, throwing stuff away is just not a good idea at all. Think REUSE :-)
There's a ton of dry cleaners out there. My first thought was to just go to the one closest to my son's preschool. I haven't been in business for dry cleaning lately (I mean, who needs suits and fancy stuff for the playground???), so I haven't thought about it much. But then I noticed Next Cleaners that I frequently pass, and I went inside to see what they have to offer.
I found out that they use the most eco friendly systems in the industry. They are also one of the small group of dry cleaners in the country using GreenEarth Cleaning technology.
In addition to utilizing the environmentally friendly techniques, they strive to reduce all dry cleaning waste by using other recyclable and reusable materials throughout their operations. Sounds good, so I decided to have my jeans fixed there, even though sewing is sewing, whether in a green place or not. I like to support their business though.

Please consider a green or organic dry cleaner if you use them. It's so much better for the environment and for our health! And the places are out there, it's not that you have to search for them and drive long distances, they're right in town.

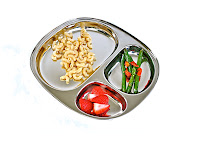
And so are other eco-friendly businesses as well, like Yellow Margosa in Montclair. If you're concerned about plastics and chemicals in your child's tableware, this is the place to go. At Yellow Margosa, you'll find stainless steel products completely free of dioxins and chemicals.
Also offered are notebooks made from sugarcane that save forest based resources and have a smaller carbon print.
Visit the site and give these great products a try, I'm sure you'll love it!


I hope all these green businesses keep popping out, I really like the development. Hope you do, too.

ShareThis